Christian Beer

Christian Beer

Itches With Cocoa Autolayout (With Solution)

Mac OS X Lion (10.7) adds a very capable new method to Cocoa to layout views. Say goodbye to struts and springs and hello to auto layout contstraints.

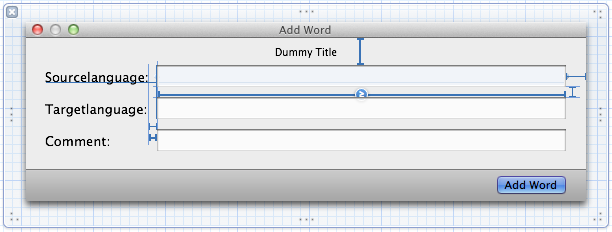
But there are some itches with auto layout that bit me while trying to layout a basic vocabulary input form: iVocabulary Add Word

These itches were:

  1. Defining constraints that resize the window was impossible in IB
  2. Getting the views in a NSDictionary did not work as intended (for me)

1. Defining constraints that resize the window
This form contains three text fields, that all can change their size when the font changes. The user can choose font and size for each of the input fields.

The desired behaviour is: the window resizes and all textfields below the changed textfield move.

First, I tried to define the constraints using Interface Builder, but that didn’t work. IB tried to be extremely smart and removed some constraints as soon as I added the last contraint (between the comment field and the surrounding view). My plan was to add constraints between all views in the vertical order.

In my second and successful attempt I used ASCII art in windowDidLoad. The ASCII-Art was as easy as: V:|-[delimiterInfo]-[sourceField]-[targetField]-[commentField]-50-|

The result is nice and behaves as expected: Word input
form

The methods -[UIView addConstraints:options:metrics:views:] view parameter expects a dictionary containing the views mapped to the keys used in the ASCII-art. There is a macro you can use to get this dictionary by binding names: NSDictionaryOfVariableBindings but that didn’t work for me, because my ivars had a prefix and I didn’t want to specify that prefix in the ASCII- art. That lead to itch #2:

2. How to get a NSDictionary containing the views
In IB you can set an identifier for each view:

So my thought was: why not use that identifier to specify the views. Therefore I created a category for NSView containing one method:

- (NSDictionary*)dictionaryWithSubviewsByIdentifier
{
    NSMutableDictionary *dict = [NSMutableDictionary dictionaryWithCapacity:self.subviews.count];
    [self.subviews enumerateObjectsUsingBlock:^(id obj, NSUInteger idx, BOOL *stop) {
        NSView *view = obj;
        if (view.identifier) {
            [dict setObject:view forKey:view.identifier];
        }
    }];
    return dict;
}

This way you can define the identifier in IB and you don’t need to have a binding for each and every view you want to use in your ASCII-art.

UPDATE:
Like Ken says in the comment: you don’t need this hacks, you simply need to define the right constraints. The trick is: define all vertical pins (aka constraints) from top to bottom and all works like a charm. Thanks Ken!

NSURLRequest and Authentication

The internet is not only browsers and static HTML pages anymore. Most apps today also talk to servers and get or send their precious data. To prevent unwanted guests to steal your data you must think about authentication.

There is an easy way to add authentication information to a request: http://user:very!secure$password!!@webservice.com/precious/data

But that’s not cool. You need to add these information to all requests and that can be quite a hassle.

We are lucky as there are some very helpful classes in Cocoa. To store the credentials we can use the class NSURLCredential and add them to a NSURLProtectionSpace to map them to a host. Here is an example of it in action:

NSURLCredential *cred;
NSURLProtectionSpace *space;

cred = [NSURLCredential credentialWithUser:@"user"
                                  password:@"very!secure$password!!"
                               persistence:NSURLCredentialPersistenceForSession]; 
space = [[NSURLProtectionSpace alloc] initWithHost:@"webservice.com" 
                                              port:80 
                                          protocol:@"http" 
                                             realm:@"Secure area"
                              authenticationMethod:nil]; 
[[NSURLCredentialStorage sharedCredentialStorage]
      setDefaultCredential:cred 
        forProtectionSpace:space];
[space release];
[cred release];

That’s all. This way also requests in a UIWebView can be authenticated.

Dropbox File Download With NSOperation

Dropbox provides a rather great SDK for iOS that wraps the REST API in some convenient Cocoa classes. Using that SDK you can very easily log in to Dropbox, upload files, grap metadata (folder content and the like) and download files.

Extending iVocabulary with a Dropbox interface, I wanted to add the option to upload and download ProVoc files to/from Dropbox. But ProVoc files are so called bundles, that are more folders than files (they look like files in the finder, though). So downloading these “files” is a combination of getting metadata and downloading the files. (Disclaimer: Dropbox doesn’t like you to walk the folder tree recursively! But as the ProVoc bundles are at most 1 level deep, I think it’s ok).

My first attempt to do the download of these folders was very naive: get the metadata of the ProVoc file (folder) and get all files / folders recursively. As I said: the folders are not deeply nested, but there can be a lot of media files: images and audio. So this approach led to a huge amount of open connections in parallel what led to errors.

My new approach involves NSOperationQueue, a very handy class, that provides a queue for operations that are processed in parallel. There are some NSOperation implementations for your convenience and you can create your own NSOperation implementations. I found a very short introduction to NSOperationQueue and how it works with NSURLConnection here: Concurrent Operations Demystified. That helped to get it to work very quickly.

Using NSOperationQueue I can now enqueue all file and metadata requests and then wait until all downloads are finished. Let’s look how I did it:

NSOperation

To build your own (asynchronous) NSOperation implementation you need to do the following:

  1. Implement lifecycle properties: isExecuting, isFinished
  2. Implement lifecycle methods: start and finish

The Properties are straight forward to implement:

@interface DropBoxOperation : NSOperation {
    BOOL _isExecuting;
    BOOL _isFinished;
}
@property (readonly) BOOL isExecuting;
@property (readonly) BOOL isFinished;
@end

and

@synthesize isExecuting = _isExecuting;
@synthesize isFinished = _isFinished;

I implemented these in an abstract class called DropBoxOperation that is extended by special operations for downloading metadata and files. These two subclasses implement start and finish.

My operations also provide a delegate mechanism to react on downloaded files and metadata but that is not shown here.

DropBoxDownloadFileOperation

As an example I will show how I implemented start and finish for downloading files. Downloading metadata works nearly the same.

- (void)start {
    if (![NSThread isMainThread]) {
        [self performSelectorOnMainThread:@selector(start) 
                               withObject:nil 
                            waitUntilDone:NO];
        return;
    }

    [self willChangeValueForKey:@"isExecuting"];
    _isExecuting = YES;
    [self didChangeValueForKey:@"isExecuting"];

    _restClient = [[DBRestClient alloc] initWithSession:[DBSession sharedSession]];
    _restClient.delegate = self;

    [_restClient loadFile:_remotePath 
                 intoPath:_localPath];

    if (_restClient == nil)
        [self finish];
}
- (void)finish {
    [self willChangeValueForKey:@"isExecuting"];
    [self willChangeValueForKey:@"isFinished"];

    _isExecuting = NO;
    _isFinished = YES;

    [self didChangeValueForKey:@"isExecuting"];
    [self didChangeValueForKey:@"isFinished"];
}  

#pragma mark DBRestClientDelegate  

- (void) restClient:(DBRestClient *)client loadedFile:(NSString *)destPath {
    // notify delegate
    [self finish];
}
- (void) restClient:(DBRestClient *)client loadFileFailedWithError:(NSError *)error {
    // notify delegate
    _error = [error copy];
    [self finish];
}

The only special part is the first lines of code in the start method: Because the DBRestClient uses NSURLConnection, the code must be run on the main thread. Otherwise the NSURLConnections delegates won’t be called.

The other parts are straight forward: the state is getting updated and the rest-client is used to load the file. After the download has been finished, the delegate methods of the rest-client get called and they call the method finish where the state gets updated accordingly.

How is it used?

In my Dropbox-download manager class, I implemented a method for my convenience that adds a download request to the queue:

- (void) addLoadFile:(NSString*)remotePath {
    NSString *localPath = [self localPathFromRemotePath:remotePath]
    DropBoxDownloadFileOperation *operation = 
      [[DropBoxDownloadFileOperation alloc] initWithRemotePath:remotePath
                                                     localPath:localPath];
    operation.delegate = self;
    [_queue addOperation:operation];
    [operation release];
}

My metadata download operation calls the DBRestClientDelegate method on its delegate. I used that to implement a recursive download of the folders and files (addLoadMetadata: works the same as addLoadFile:):

- (void)restClient:(DBRestClient*)client loadedMetadata:(DBMetadata*)metadata {

    if (metadata.isDirectory) {
        NSString *remotePath = metadata.path;
        NSString *localPath = [self localPathFromRemotePath:remotePath];

        NSError *error = nil;
        [[NSFileManager defaultManager] createDirectoryAtPath:localPath 
                                  withIntermediateDirectories:YES
                                                   attributes:nil
                                                        error:&error;];

        for (DBMetadata *fileMD in metadata.contents) {
            if (fileMD.isDirectory) {
                remotePath = fileMD.path;
                localPath = [self localPathFromRemotePath:remotePath];

                error = nil;
                [[NSFileManager defaultManager] createDirectoryAtPath:localPath 
                                          withIntermediateDirectories:YES
                                                           attributes:nil
                                                                error:&error;];

                [self addLoadMetadata:fileMD.path];
            } else {
                [self addLoadFile:fileMD.path];
            }
        }
    }    
}

(error handling has been striped out for readability).

My findings

I didn’t use NSOperation that much before and I am very sad I didn’t use it! It is such a convenient way to handle asynch tasks without bothering with NSThreads.

The biggest argument for NSOperation/-Queue is the parallelability that you get as a gift. When using NSOperation for tasks, Grand Central Dispatch can decide on which processor the task shall run. With a blink of an eye your app runs on all cores of your iPhone … errr … I mean … Mac ;)
Hands on Tutorial to NSDateComponents

Calculating dates is quite a hard thing to do. You need to keep in mind that adding or subtracting days (or months, hours, …) to a date can lead to changing months or even years: Getting the date of “two days before the first of January” leads to substract a year and a month from the current date, the result is the 29th of December a year before. You even need to keep leap years in mind.

But there are tools in Cocoa that takes all the heavy stuff off of calculating dates: the NSDate, NSCalendar and NSDateComponents classes. There are (at minimum) two things you can do using NSDateComponents: get components of a date and calculate new dates by changing components.

Getting Date Components

Getting date components of a given NSDate is very easy using NSDateComponents:

-(int)month:(NSDate*)date { NSDateComponents *comps = [[NSCalendar currentCalendar] components:NSMonthCalendarUnit fromDate:date]; return comps.month; }

To access components of a given NSDate we are using NSCalendar to get a group of components of it. Here we are interested in the month. So at first we are asking NSCalendar for the NSMonthCalendarUnit of our given date.

After that we can access the specified units from the NSDateComponent. What’s important to know is that accessing units we didn’t specify on components:fromDate won’t give the correct values but more or less random values.

You can also use NSDateComponents to get a date that only contains the values for given components. For example you can get a NSDate that contains the beginning of the day without hours, minutes, seconds, etc.:

NSDate *date = [NSDate date]; NSDateComponents *comps = [[NSCalendar currentCalendar] components:(NSYearCalendarUnit | NSMonthCalendarUnit | NSDayCalendarUnit) fromDate:date]; NSDate *beginningOfDay = [[NSCalendar currentCalendar] dateFromComponents:comps];

Calculating New Dates

To calculate new dates from a given date, you can configure a NSDateComponents instance as an offset to a date:

-(NSDate *)previousMonth:(NSDate*)date { NSDateComponents *comps = [[NSDateComponents alloc] init]; [comps setMonth:-1]; NSCalendar *cal = [NSCalendar currentCalendar]; NSDate *date = [cal dateByAddingComponents:comps toDate:date options:0]; [comps release]; return date; }

At first we instantiate a NSDateComponent and configure it with the offsets we want to add to the NSDate. In this example we want to calculate the date a month before today so we set the month to -1.

After that we create a new NSDate by adding the components to the given date.

Summary

NSDateComponents provides some really great functionality for creating dates with only requested components and to calculate dates as offsets from a given date. The class ensures that the calculated date is valid.

For my projects I created a NSDate category that provides some convenient methods to get date components and calculated dates.

Cross Compile ProVoc With Cocotron?

To build a vocabulary editor for Windows I considered building one in Java as the only option. But then I found the project Cocotron. Cocotron is an implementation of Cocoa for Windows and Linux (and could also be ported to other plattforms). It is easily integrated to Xcode so that you can build the Windows version of your application with few clicks.

For building Cocotron you need to install some tools. These are downloaded and installed with few steps that are well documented on the Cocotron website. The navigation is not always clear on that website but you can find your way through it. The website itself is also coded in Objective-C and compiled for Linux using Cocotron.

After you installed the needed tools you can checkout (or download) and compile Cocotron. For me the Cocoa project was all I had to build since it references some of the other needed packages. With the build process the library gets installed into the Developer folder.

The next step is to add a new target to your existing (or new) project. You can easily do so by copying an existing Mac OS target and clean up and adapt the build settings. That process is also well documented on the Cocotron website but it take some trial and error for me to find out if I did all I need. As soon as you don’t get any low level errors from gcc you can start porting your application. Depending on the complexity of your application it may use some parts of Cocoa that are not implemented in Cocotron by now.

For ProVoc the last part was not easy and is not finished by now. I added many #ifdef _WIN32 and #ifndef __APPLE__ to the code to disable unimplemented parts and it builds without errors (but with many warnings). ProVoc starts on Windows but there still seem to be some problems as it hangs shortly after starting. You can also debug your application on Windows using Insight-GDB what I started to do at last.

As soon as I find some free time I will continue trying to get ProVoc run on Windows and I will post my findings here.

Wordpress DB Got Deleted…

Sorry folks, I accidentially deleted the database of my wordpress installation (copy&paste; error). But I am checking googles cache to get the content back on my page…